
For as long as I can remember, my mom has had a traditional, ceramic Christmas village that we set up on the mantle each year. Long before I probably should have been handling fragile miniatures, I was entrusted with the task of unwrapping each tiny house, and deciding the layout of that year's Christmas village. Sometimes the church and the itty-bitty carolers were front and center; more often, as I got older and snarkier, it was the public house or the inn that the other buildings were clustered around. Either way, it never felt like the holiday season had truly begun until the village was twinkling on the mantle.
This year, I decided it was time to start some new traditions- complete with my very own Christmas village. I wanted mine to be a little more modern, a little more colorful, and, of course, DIY-able.

I'm so happy with how it turned out! It reminds me of a quaint little French village...though, with the color scheme, maybe it's more like a quaint Miami village. Here's the scoop, if you'd like to make your own:
I primarily used this tutorial for the houses, and this one for the trees, but I made a few modifications to make my life easier.
For the houses:
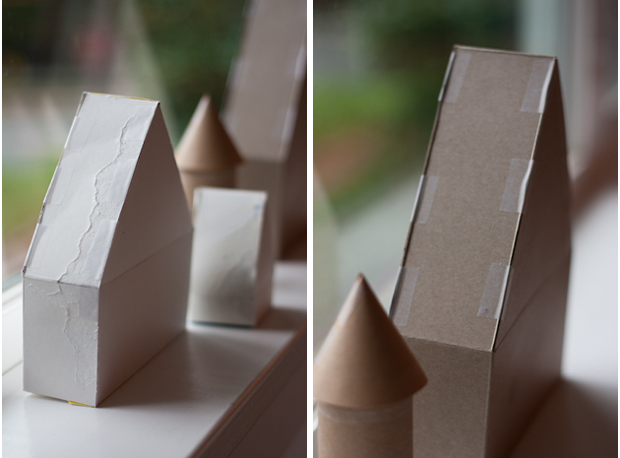
- First, I used tape almost exclusively to construct the houses. I find glue to be a fickle mistress, and I was getting so frustrated with attempting to get all my little folded edges to fit perfectly and then stay in place while the glue was drying, that at one point I actually King Kong-stomped one of my houses. Yep. Full-on temper tantrum. Once I discovered that I could forgo all the folding and tucking and gluing and just tape the damn things together, I ran around the house gleefully dumping things from their boxes and stealing the centers out of our toilet paper rolls in my haste to make more houses. Yes, you can see the tape a little bit in the finished product, but it really doesn't detract from the effect at all, and it made the project so much less fussy.
- For the towers, or silos as I like to think of them, I simply made little cone shapes out of Kraft paper for the roof, and glued them on top of toilet paper rolls (yes, I deigned to use glue).
- If you want your village to be lit at night, just cut small holes in the bottom of your houses for the lights, and make little "windows" in front for the light to shine out of. Ultimately, I decided I liked mine just the way it was, and left the twinkling to the Christmas tree.
For the houses:
- First, I used tape almost exclusively to construct the houses. I find glue to be a fickle mistress, and I was getting so frustrated with attempting to get all my little folded edges to fit perfectly and then stay in place while the glue was drying, that at one point I actually King Kong-stomped one of my houses. Yep. Full-on temper tantrum. Once I discovered that I could forgo all the folding and tucking and gluing and just tape the damn things together, I ran around the house gleefully dumping things from their boxes and stealing the centers out of our toilet paper rolls in my haste to make more houses. Yes, you can see the tape a little bit in the finished product, but it really doesn't detract from the effect at all, and it made the project so much less fussy.
- For the towers, or silos as I like to think of them, I simply made little cone shapes out of Kraft paper for the roof, and glued them on top of toilet paper rolls (yes, I deigned to use glue).
- If you want your village to be lit at night, just cut small holes in the bottom of your houses for the lights, and make little "windows" in front for the light to shine out of. Ultimately, I decided I liked mine just the way it was, and left the twinkling to the Christmas tree.

For the trees:
- I used these plastic cones (found at my local Joann's), rather than styrofoam, then cut them down to my desired heights. My trees are about 6, 8, and 10 inches tall.
- I opted to use tacky glue for the entire process, rather than a hot-glue gun. Initially I did this because I was afraid the hot glue would melt the plastic cones, but now that I've gone through the process, I would recommend avoiding hot glue, even if you're using styrofoam cones instead of plastic. It's a bit of a squidgy process (you're trying to wrap straight pieces of felt around something conical, so it's not an exact science), and I often did a fair amount of adjusting with my fingers before I got the strip to lay just right. Had I been using a hot glue gun, I suspect I would have gotten burned. A lot.
- Though it's not called out in the instructions, don't forget to measure the circumference at the base of your trees to determine how long to make your longest pieces of felt.


No comments:
Post a Comment